You can create an ASP.NET Core web application which is able access Microsoft or Google account of a user via IMAP and SMTP without knowing the password of this user. This works with all the domains these providers support, such as:
We developed OAuthNetCoreMVC2 sample which encapsulates the matters mentioned in this tutorial. You can open/edit this sample (see Get source code for details) or create your own ASP.NET Core project.
To write or build OAuthNetCoreMVC2 sample, you need at least Visual Studio 2017 and .NET Core 2.0 or newer.
The sample works via https on localhost. To find instructions on how to configure a local IIS Express to run on a custom domain, see classic ASP.NET version of this tutorial.
localhost endpoint is intended for development only. In production, your app will run on its dedicated domain and you'll need to register the respective domains in Google and Microsoft admin panels.
OAuthNetCoreMVC2 sample was developed in C#.
Google Apps platform provides the special way of accessing user accounts in your domain with Service Accounts. IT'S VERY SIMPLE and can be used for both installed and web apps just the same way. See Google OAUTH2 for Service Accounts tutorial to learn more.
Microsoft does not yet support the concept of service accounts.
The current version of ASP.NET Core provides native means of external authentication (including OAuth 2.0).
However, this API and Visual Studio MVC template provide only basic means of OAuth 2.0 functionality, while some important matters like refreshing short-lived access tokens are not fully covered. It also lacks the ability to share access tokens obtained during OAuth process with other applications (such as Windows services which need to perform background activities in the user's account). This tutorial aims to address these issues as well.
OAuthNetCoreMVC2 sample highlights these aspects related to OAuth 2.0 development with ASP.NET Core:
Unlike classic ASP.NET version, all the code is contained directly in the sample. There is no separate ExternalProviders library. In production, you're welcome to move all OAuth provider-specific code into a separate class or library.
The below is the common description of the procedure. Every step will be explained in detail in subsequent sections.
Other steps are only needed if you're creating a new ASP.NET project (rather than using OAuthMVC5 sample):
In OAuthNetCoreMVC2 we also made some changes to the templates to add some buttons (e.g. Send or Check Mail).
If you develop on your local machine (IIS Express or Kestrel), you'll most likely use localhost as the host name. Now both Microsoft and Google providers support this. In earlier days, you had to use a custom domain with Microsoft but this is no longer required.
For localhost, https is not required, http is fine. However, in production, when your real web host domain.com is used, https is a must. To it easier for you to make transition from localhost to the real Internet domain, we're using https://localhost here, even though https it's not required for localhost.
Skip this if you target Microsoft provider only.
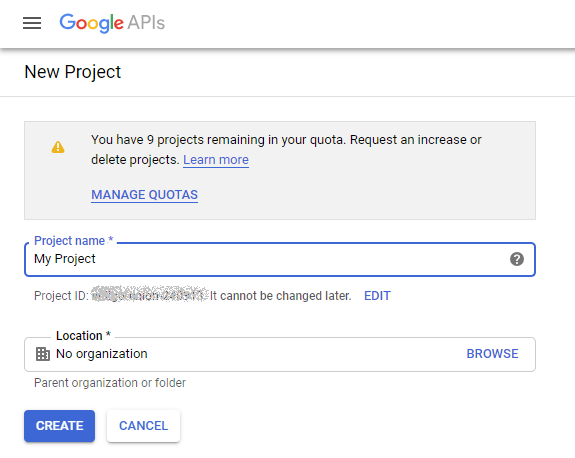
First, you need to register a project in your Google Developer Console:

If you already have a Google project where you have credentials for an installed application, you can just create web application credentials for that project instead of creating a new project (useful in case if you want to have both web and Windows installed applications use the same credentials).
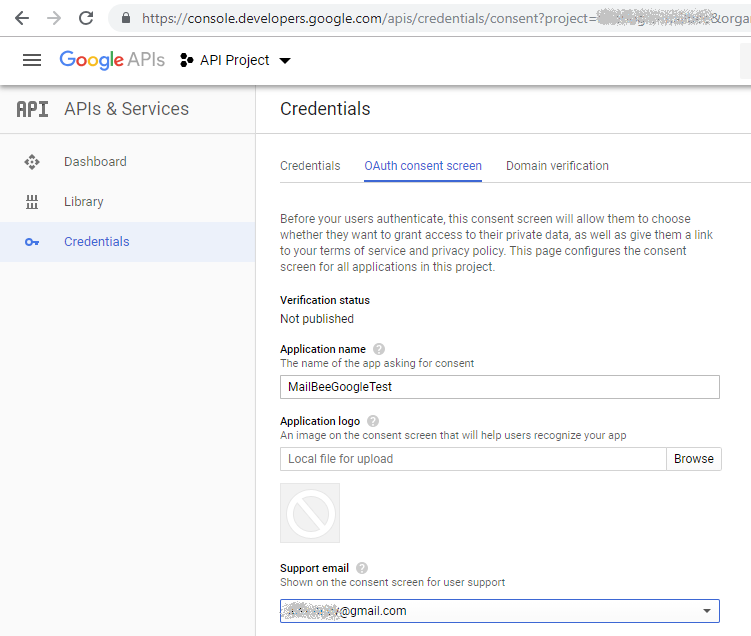
Now, at "API Manager/Credentials/OAuth consent screen" section specify your support e-mail address and your product name. People will see this info when authorizing your application on access to your mailbox:
Click Save.
Then, at "API Manager/Credentials/Credentials" section click Create Credentials and select OAuth Client ID. Create a new Client ID selecting "Web application" type, you can leave any name for client ID.
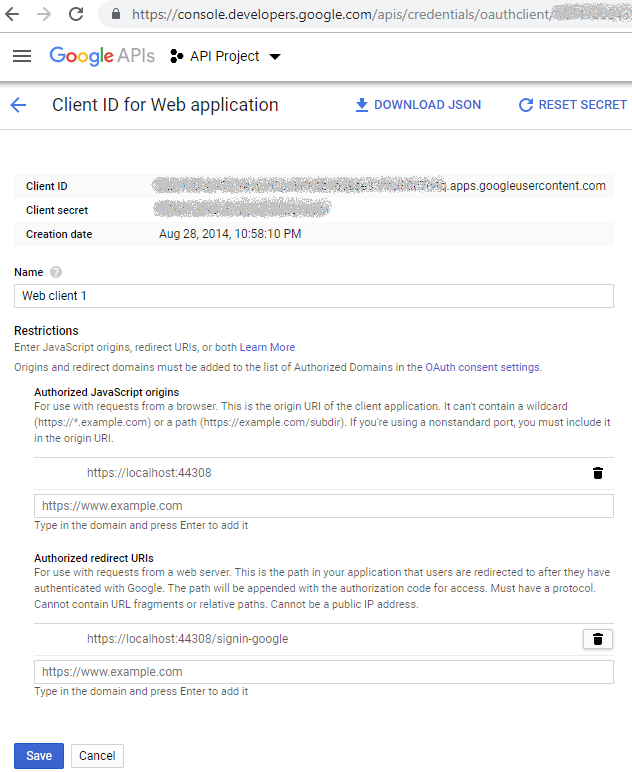
Now, let's have a closer look at the settings.
Authorized JavaScript Origins must point to the URL of your application.
We set it as https://localhost:44308/. Instead of 44308, there can be any number IIS Express associated for the port to run your web app on.
If you don't know which port to specify (e.g. your web app is not created yet), you can easily adjust the port number in Edit Client Settings dialog later.
Authorized Redirect URI denotes the particular URL where Google will redirect the application upon successful authorization. Set it to:
MVC template in Visual Studio by default reserves /signin-google as the redirect landing page so we tell Google to redirect there. Actually, it can be changed but we're fine with the default value.
Now, in "API Manager/Credentials/OAuth consent screen" section specify your support e-mail address and your product name. People will see this info when authorizing your application to access their mailboxes:

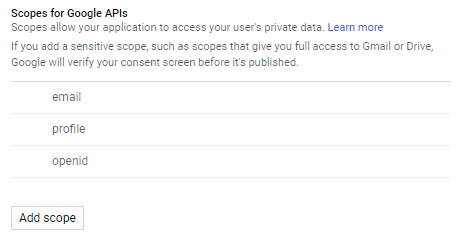
Also, make sure you have email, profile and openid scopes added in Scopes for Google APIs section:
Later, during the actual OAuth authorization process, your users may get "The app isn't verified" warning on the consent screen if you didn't confirm that your domain actually belongs to you in Google Developers Console. Obviously, localhost cannot be confirmed, so the users will have to click advanced to ignore this warning.
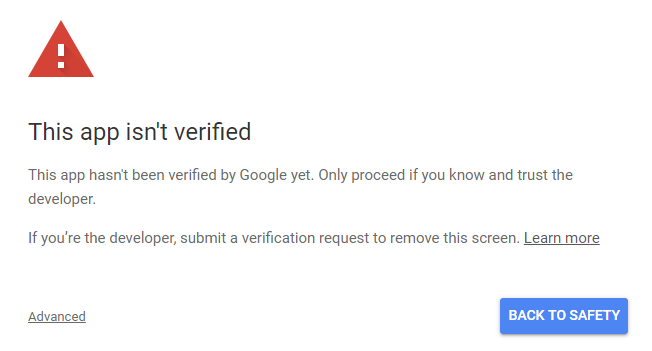
As soon as you run uploaded your web app on the actual Internet domain (not on localhost), you'll need to complete the domain Verification process ("API Manager/Credentials/Domain verification") to get rid of this warning.
In "API Manager/Credentials/Credentials" section, click your web client's name to grab your Client ID and Client Secret which you'll specify in your ASP.NET app later.
You will also need to go to "API Manager/Library" and locate "Gmail API" and "Google+ API":
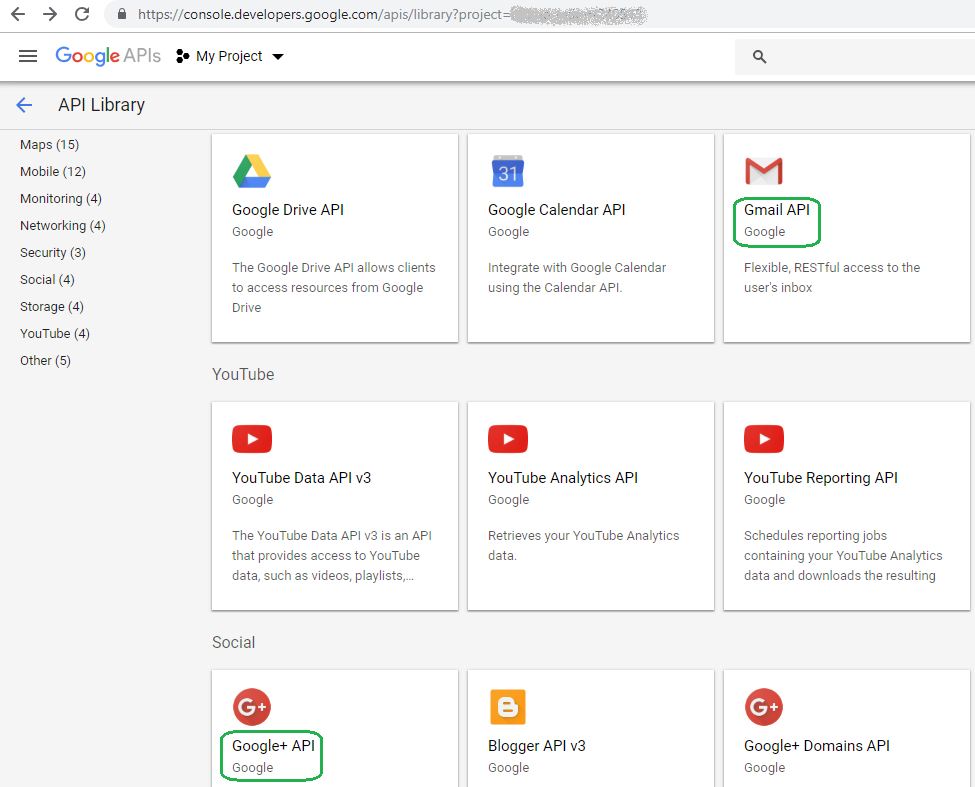
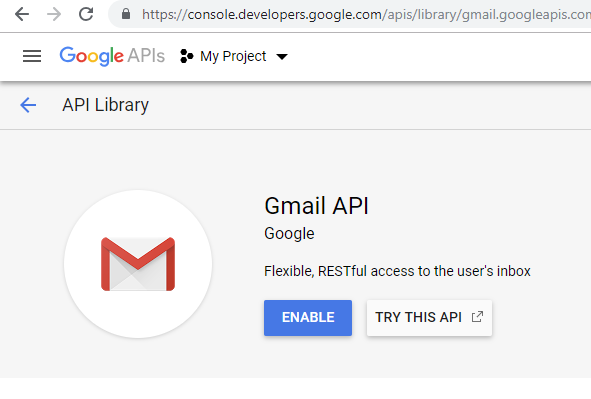
Click and enable "Gmail API" to let your application authenticate in Gmail services with XOAUTH2 (OAuth 2.0 extension for IMAP and SMTP):
Finally, repeat the same for "Google+ API" to let your application see the e-mail address of the user:
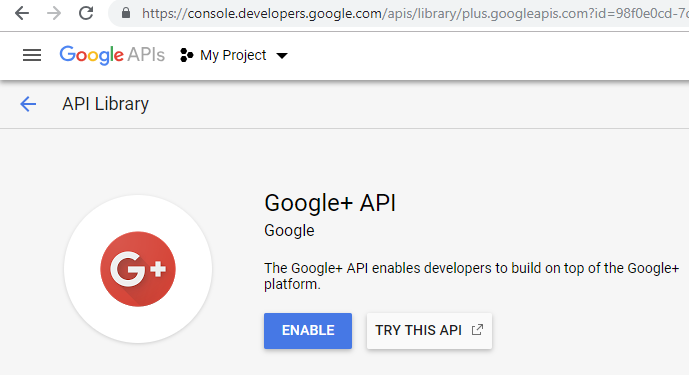
There can be a few minutes delay on Google end for these changes to take effect.
Skip this if you target Google provider only.
Create an application in Application Registration Portal. You may need to create an account there first.
For OAuth 2.0, you should create a Converged application. Click Add an app in Converged applications section, then Add Platform in Platforms section and select Web.
Microsoft is changing things there often. You may be prompted to use Azure portal instead. Or, sometimes, Live SDK application performs better. Some trial and error may be needed to find out which options works for you. In our tests, both Converged application and Live SDK application worked well.
On the next screen, click Add Platform and select Web application, then save changes. You'll be redirected to the App Registration page:
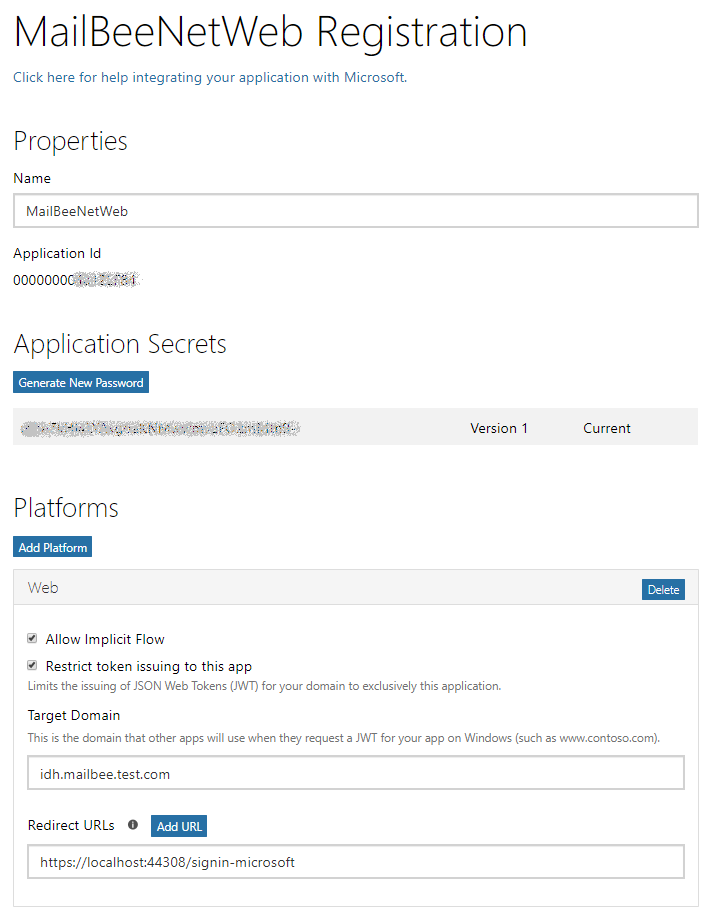
In Application Secrets, click Generate New Password (in case of Converged application) and save the password for later use. Not needed for Live SDK application.
Add https://localhost:44308/signin-microsoft (or whatever port your ASP.NET Core app uses) in Redirect URLs section.
/signin-microsoft part of the URL is the default redirect target page for Microsoft provider in the MVC template.
In case of Live SDK application, Target Domain field is also displayed. You cannot specify localhost there, a unique domain must be used (even though it can be different from the one specified in the Redirect URL. We're using idh.mailbee.test.com. For Converged applications, you don't need to worry about Target Domain.
Be sure to add permissions to access the user's mailbox, retrieve their profile and email address. For that, in Microsoft Graph Permissions on the same page you need to add email, offline_access, profile, and User.Read:
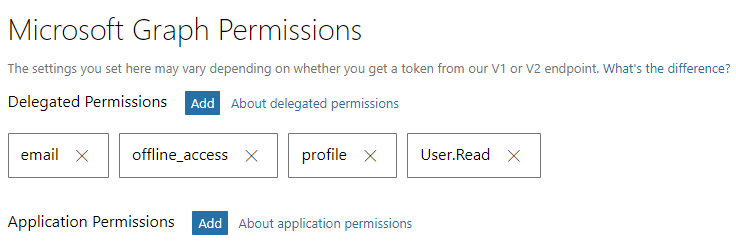
Save changes.
On the same App Registration page, you can grab your Client ID and Client Secret which you'll specify in your ASP.NET Core app later:
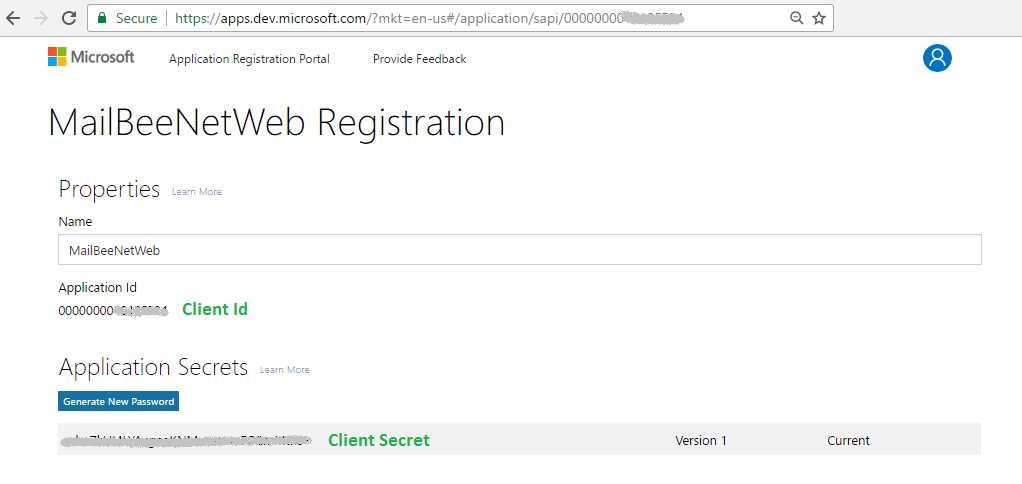
Microsoft portal may show the password only once (in case of Converged application) so if you didn't save it elsewhere, you may not have a chance to retrieve it again (but you can create a new password instead).
The sample uses database (by default, mssqllocaldb), so need to run this in Nuget console:
Update-Database
If you want to change the database settings, you'll need to edit DefaultConnection in appsettings.json.
The app runs at https://localhost:44308 by default. If you run it from Visual Studio, it will be run under IIS Express by default. If you run it from the command line (compile.bat and run.bat in the project folder) or change the default configuration in Visual Studio, Kestrel web server will be used. In case of Kestrel, you'll need to set or generate a self-signed SSL certificate and let Kestrel know. That's how we do it (in Program.cs):
BuildWebHost
.UseKestrel(options =>
{
    options.Listen(IPAddress.Loopback, 44308, listenOptions =>
    {
        // Run this in the command line to create a self-signed cert if needed (assuming the current folder is the project folder):
        // dotnet dev-certs https -ep "localhost.pfx" -p 12345 --trust
        listenOptions.UseHttps("localhost.pfx", "12345");
    });
})
Again, the above won't have any effect in case if you're using IIS Express. For IIS Express, there is no need to generate the self-signed certificate, it will be supplied automatically.
Now, let's review the OAuth-specific code changes.
Startup.cs changes:
ConfigureServices
if (GoogleClientId != null)
{
    services.AddAuthentication().AddGoogle(googleOptions =>
    {
        googleOptions.ClientId = GoogleClientId;
        googleOptions.ClientSecret = GoogleClientSecret;
        googleOptions.Scope.Add("https://mail.google.com/");
        googleOptions.Scope.Add("profile");
        googleOptions.SaveTokens = true;
        googleOptions.AccessType = "offline";
        googleOptions.AuthorizationEndpoint += "?prompt=consent";
        googleOptions.Events.OnCreatingTicket = ctx =>
        {
        // This code is not need to run the sample. You can use for debugging (if you set a breakpoint here) to see which tokens are available to your application.
        List<AuthenticationToken> tokens = ctx.Properties.GetTokens().ToList();
            return Task.CompletedTask;
        };
    });
}

if (MicrosoftClientId != null)
{
    services.AddAuthentication().AddMicrosoftAccount(microsoftOptions =>
    {
        microsoftOptions.ClientId = MicrosoftClientId;
        microsoftOptions.ClientSecret = MicrosoftClientSecret;
        microsoftOptions.SaveTokens = true;
        microsoftOptions.Scope.Add("wl.emails");
        microsoftOptions.Scope.Add("wl.offline_access");
        microsoftOptions.Scope.Add("wl.imap");
        microsoftOptions.TokenEndpoint = "https://login.live.com/oauth20_token.srf"; // The default endpoint doesn't support wl.* scopes so we're setting another one.
    });
}
In the above, we...
OnCreatingTicket callback can be set (not required for tha app to run but lets you use the debugger to examine the tokens you application receives)SaveTokens to true (we need this to keep the tokens available to the code down the pipeline, this code will persist the tokens in the database)Controllers\AccountController.cs changes:
ExternalLoginCallback
// This will update access and refresh tokens in AspNetUserTokens table.
IdentityResult signInResult = await _signInManager.UpdateExternalAuthenticationTokensAsync(info);

// This will update the user's display name and email in AspNetUserTokens table.
ApplicationUser appUser = await _userManager.FindByLoginAsync(info.LoginProvider, info.ProviderKey);
await _userManager.SetAuthenticationTokenAsync(appUser, info.LoginProvider, Startup.DisplayName, info.Principal.Identity.Name);
await _userManager.SetAuthenticationTokenAsync(appUser, info.LoginProvider, Startup.Email, info.Principal.FindFirstValue(ClaimTypes.Email));

if (info.LoginProvider == Startup.MicrosoftProvider)
{
    // The current behavior of Microsoft server exhibits a bug. IMAP-related scopes are not enabled in the initial access token.
    // We need to refresh it at least once to have IMAP scopes included. Thus, we correct the expiration date to the current time.
    // This will make the token to be refreshed next time we access it (in HomeController).
    await _userManager.SetAuthenticationTokenAsync(appUser, Startup.MicrosoftProvider, Startup.ExpiresAt, DateTime.UtcNow.ToString("o", CultureInfo.InvariantCulture));
}
In the above, we...
ExternalLoginConfirmation - the same changes as in ExternalLoginCallback (in production app, you'll make a method or class to re-use the code and call this method from ExternalLoginCallback, ExternalLoginConfirmation, etc).
Controllers\ManageController.cs changes:
LinkLoginCallback - the same changes as above.
RemoveLogin
// Remove login data from AspNetUserTokens table.
_dbContext.UserTokens.RemoveRange(_dbContext.UserTokens.Where(ut => ut.UserId == user.Id && ut.LoginProvider == model.LoginProvider));
await _dbContext.SaveChangesAsync();
The above cleans up the tokens table in case if certain OAuth login is removed.
Controllers\HomeController.cs changes:
We...
AccessTokenResponse class which respresents JSON response from Microsoft OAuth serverDummyDataStore class, an instance of this class we'll then pass to Google Auth API (by default, Google API saves the tokens on the filesystem but we want to save them ourselves in AspNetUserTokens table so we're constructing a class which will prevent automatic saving tokens on the filesystem)public HomeController(UserManager<ApplicationUser> userManager, SignInManager<ApplicationUser> signInManager)GetGoogleTokenAsync and GetMicrosoftTokenAsync methods for reading (and refreshing if necessary) access tokens from the AspNetUserTokens tableCheckInboxOrSendMail method which gets the access tokens for the desired provider and then uses them and MailBee.NET Objects to build XOAUTH2 key and then authenticates via IMAP/SMTP on Google or Microsoft mail servers to actually send or check e-mail.private async Task<string> GetGoogleTokenAsync(ApplicationUser appUser, string externalAccessToken, string externalRefreshToken, DateTime externalExpiresAtUtc)
{
TokenResponse token = new TokenResponse { AccessToken = externalAccessToken, RefreshToken = externalRefreshToken };
// Dummy data source is used because we don't want RefreshTokenAsync to store anything to disk.
// We'll store the token manually in the user's claims (AspNetUserClaims table).
// Production code can be modified to implement custom IDataStore which will directly read/write
// AspNetUserClaims table.
UserCredential credential = new UserCredential(new GoogleAuthorizationCodeFlow(
new GoogleAuthorizationCodeFlow.Initializer
{
ClientSecrets = new ClientSecrets() { ClientId = Startup.GoogleClientId, ClientSecret = Startup.GoogleClientSecret },
DataStore = new DummyDataStore()
}), null, token);
DateTime nowUtcAdjusted = DateTime.UtcNow.AddMinutes(1);
// Uncomment to test token refresh mechanism (uncommenting will make an access token expire every minute so you won't have to wait an hour for that).
// nowUtcAdjusted = nowUtcAdjusted.AddMinutes(59);
if (nowUtcAdjusted > externalExpiresAtUtc)
{
// Unfortunately, Google API v1.40 hangs here sometimes (especially if ClientID and ClientSecret are very long). Hopefully this will be fixed in newer versions.
bool refreshResult = await credential.RefreshTokenAsync(CancellationToken.None);
if (refreshResult)
{
externalAccessToken = credential.Token.AccessToken;
await _userManager.SetAuthenticationTokenAsync(appUser, Startup.GoogleProvider, Startup.AccessToken, externalAccessToken);
externalExpiresAtUtc = credential.Token.IssuedUtc.AddSeconds(credential.Token.ExpiresInSeconds.Value);
await _userManager.SetAuthenticationTokenAsync(appUser, Startup.GoogleProvider, Startup.ExpiresAt, externalExpiresAtUtc.ToString("o", CultureInfo.InvariantCulture));
}
else
{
return null;
}
}
return externalAccessToken;
}
The above uses Google API to refresh access tokens. You can uncomment nowUtcAdjusted = nowUtcAdjusted.AddMinutes(59); line to make access token expire each time this page is accessed (by default, it will be refreshed every hour). This is useful for debugging in case if you want to test token refresh mechanism.
Updated token is saved in AspNetUserTokens table. Google API is not used for that.
private async Task<string> GetMicrosoftTokenAsync(ApplicationUser appUser, string externalAccessToken, string externalRefreshToken, DateTime externalExpiresAtUtc)
{
    const string refreshTokenUrl = "https://login.live.com/oauth20_token.srf";

    // We'll consider an access token expired if it expires in a minute from now.
    DateTime nowUtcAdjusted = DateTime.UtcNow.AddMinutes(1);

    // Uncomment to test token refresh mechanism (uncommenting will make an access token expire every minute so you won't have to wait an hour for that).
    // nowUtcAdjusted = nowUtcAdjusted.AddMinutes(59);

    if (nowUtcAdjusted > externalExpiresAtUtc)
    {
        // The code below refreshes an access token if it's expired or about to expire.
        // 'scope' parameter sets the IMAP/SMTP related scopes.
        HttpClient client = new HttpClient();
        string parameters = $"grant_type=refresh_token&refresh_token={ WebUtility.UrlEncode(externalRefreshToken) }&" +
            $"client_id={ WebUtility.UrlEncode(Startup.MicrosoftClientId) }&client_secret={ WebUtility.UrlEncode(Startup.MicrosoftClientSecret) }&" +
            $"scope={WebUtility.UrlEncode("wl.emails wl.offline_access wl.imap")}";
        var contentBody = new StringContent(parameters, System.Text.Encoding.UTF8, "application/x-www-form-urlencoded");
        HttpResponseMessage response = await client.PostAsync(refreshTokenUrl, contentBody);
        if (!response.IsSuccessStatusCode)
        {
            // This can be useful for debugging.
            string errorMessage = await response.Content.ReadAsStringAsync();

            // You should process 400 (bad request) error here.
            return null;
        }
        else
        {
            AccessTokenResponse tokens;
            using (Stream responseStream = await response.Content.ReadAsStreamAsync())
            {
                var reader = new StreamReader(responseStream);
                string json = reader.ReadToEnd();
                reader.Close();
                tokens = JsonConvert.DeserializeObject(json, typeof(AccessTokenResponse)) as AccessTokenResponse;
            }
            externalAccessToken = tokens.AccessToken;
            await _userManager.SetAuthenticationTokenAsync(appUser, Startup.MicrosoftProvider, Startup.AccessToken, externalAccessToken);

            // Well, not absolutely accurate as we are using client's time, not server time but considering that we're refreshing tokens not waiting for full 60 minutes
            // (we have 30 seconds extra), a second or two of the difference shouldn't matter.
            externalExpiresAtUtc = DateTime.UtcNow.AddSeconds(tokens.Expiration);

            await _userManager.SetAuthenticationTokenAsync(appUser, Startup.MicrosoftProvider, Startup.ExpiresAt, externalExpiresAtUtc.ToString("o", CultureInfo.InvariantCulture));
        }
    }
    return externalAccessToken;
}
Microsoft version is similar although it does not use any specific API library from Microsoft but rather performs all OAuth requests directly via HttpClient.
public async Task<IActionResult> CheckInboxOrSendMail(string loginProvider, bool sendEmail)
{
    // Instead of passing loginProvider in parameters, we could have obtained it as below. We're not using this result, we just demonstrating other options and their effect.
    // The difference between loginProvider and externalProvider may occur if you connected more than one external login to your user (both Microsoft and Google). If so,
    // loginProvider might be Microsoft while externalProvider would be Google (if you're logged in with Google).
    // externalProvider can be even null if you registered with a login/password account (not externally) and then just added Microsoft or Google account.
    var externalProvider = User.FindFirstValue(ClaimTypes.AuthenticationMethod);

    ApplicationUser appUser = await _userManager.GetUserAsync(User);

    // Check that we're logged in.
    if (appUser != null)
    {
        string imapHost = null;
        string smtpHost = null;

        string externalAccessToken = await _userManager.GetAuthenticationTokenAsync(appUser, loginProvider, Startup.AccessToken);
        if (externalAccessToken != null)
        {
            DateTime externalExpiresAtUtc = DateTime.Parse(await _userManager.GetAuthenticationTokenAsync(appUser, loginProvider, Startup.ExpiresAt)).ToUniversalTime();
            string externalRefreshToken = await _userManager.GetAuthenticationTokenAsync(appUser, loginProvider, Startup.RefreshToken);

            switch (loginProvider)
            {
                case Startup.GoogleProvider:
                    externalAccessToken = await GetGoogleTokenAsync(appUser, externalAccessToken, externalRefreshToken, externalExpiresAtUtc);
                    imapHost = "imap.gmail.com";
                    smtpHost = "smtp.gmail.com";
                    break;
                case Startup.MicrosoftProvider:
                    externalAccessToken = await GetMicrosoftTokenAsync(appUser, externalAccessToken, externalRefreshToken, externalExpiresAtUtc);
                    imapHost = "imap-mail.outlook.com";
                    smtpHost = "smtp-mail.outlook.com";
                    break;
                default:
                    ViewBag.Message = "Unknown login provider";
                    externalAccessToken = null;
                    break;
            }

            if (externalAccessToken != null)
            {
                string email = appUser.Email; // Gives the primary e-mail of the current user. If it's your external provider email, that would be fine.

                // However, in case if you allow multiple logins (e.g. Microsoft, Google and login/password), the above won't work. That's why we store
                // the email address for each external provider's login. Get it from the database now.
                email = await _userManager.GetAuthenticationTokenAsync(appUser, loginProvider, Startup.Email);

                string displayName = await _userManager.GetAuthenticationTokenAsync(appUser, loginProvider, Startup.DisplayName);
                string xoAuthKey = OAuth2.GetXOAuthKeyStatic(email, externalAccessToken);

                try
                {
                    MailBee.Global.LicenseKey = Startup.MailBeeLicenseKey;
                }
                catch (MailBeeLicenseException e)
                {
                    ViewBag.Message = e.ToString();
                    return View();
                }

                if (!sendEmail)
                {
                    Imap imp = null;
                    try
                    {
                        imp = new Imap();
                    }
                    catch (MailBeeLicenseException e)
                    {
                        ViewBag.Message = e.ToString();
                        ViewBag.Log = "See or uncomment MailBee.Global.LicenseKey setting in HomeController.CheckInboxOrSendMail";
                    }

                    if (imp != null)
                    {
                        // Logging is optional but useful for debugging. We use memory logging to avoid issues
                        // with file permissions but you can configure the logger to write to a file if needed.
                        imp.Log.HidePasswords = false;
                        imp.Log.Enabled = true;
                        imp.Log.MemoryLog = true;

                        try
                        {
                            await imp.ConnectAsync(imapHost);
                            await imp.LoginAsync(null, xoAuthKey, AuthenticationMethods.SaslOAuth2,
                                MailBee.AuthenticationOptions.None, null);
                            await imp.SelectFolderAsync("INBOX");
                            ViewBag.Message = imp.MessageCount.ToString() + " message(s) in INBOX";
                            await imp.DisconnectAsync();
                        }
                        catch (MailBeeException e)
                        {
                            ViewBag.Message = e.ToString();
                        }
                        finally
                        {
                            ViewBag.Log = imp.Log.GetMemoryLog();
                            if (imp.IsConnected)
                            {
                                imp.Abort();
                            }
                        }
                    }
                }
                else
                {
                    Smtp mailer = null;
                    try
                    {
                        mailer = new Smtp();
                    }
                    catch (MailBeeLicenseException e)
                    {
                        ViewBag.Message = e.ToString();
                        ViewBag.Log = "See or uncomment MailBee.Global.LicenseKey setting in HomeController.MailAction";
                    }

                    if (mailer != null)
                    {
                        mailer.SmtpServers.Add(smtpHost, null, xoAuthKey, AuthenticationMethods.SaslOAuth2);

                        // Logging is not necessary but useful for debugging. See more details in IMAP section.
                        mailer.Log.HidePasswords = false;
                        mailer.Log.Enabled = true;
                        mailer.Log.MemoryLog = true;

                        mailer.From.Email = email;
                        mailer.To.Add(email, displayName);
                        mailer.Subject = "empty email to myself";

                        try
                        {
                            await mailer.SendAsync();
                            ViewBag.Message = "E-mail sent";
                        }
                        catch (MailBeeException e)
                        {
                            ViewBag.Message = e.ToString();
                        }
                        finally
                        {
                            ViewBag.Log = mailer.Log.GetMemoryLog();
                        }
                    }
                }
            }
            else
            {
                ViewBag.Message = "Error getting the access token";
            }
        }
        else
        {
            ViewBag.Message = "You need to log in with Google account";
        }
    }
    else
    {
        ViewBag.Message = "You need to log in first";
    }
    ViewBag.LoginProvider = loginProvider;
    return View();
}
The method above obtains the access token, refreshes it if necessary, builds XOAUTH2 key, and sends e-mail or displays the number of messages in the inbox. Log of the entire conversation with the mail server is displayed on the page (or the exception text in case of an error). Note that we set HidePasswords to false because XOAUTH2 keys are less sensitive then real passwords (XOAUTH2 key is based on an access token which lasts not longer than an hour). It doesn't mean you can expose XOAUTH2 keys freely, it just illustrates that exposing them is less security risk than exposing real passwords.
And don't forget to set your MailBee.NET license key in the value of Startup.MailBeeLicenseKey constant.
If you need to use access tokens stored in AspNetUserTokens table in other applications (such as Windows services which can do background activities in user accounts), check ReadAspNetUsers sample in My Documents\MailBee.NET Objects\Samples\WinForms.NET Core 2.0\C#.
The basic idea can be expressed as the code below:
Helper classes
    public class ApplicationUser : IdentityUser
    {
    }

    public class ApplicationRole : IdentityRole
    {
    }

    public class ApplicationDbContext : IdentityDbContext<ApplicationUser, ApplicationRole, string>
    {
        public ApplicationDbContext(DbContextOptions<ApplicationDbContext> options) : base(options)
        {
        }
    }
Main method
static async Task Main(string[] args)
{
    DbContextOptions<ApplicationDbContext> options = new DbContextOptionsBuilder<ApplicationDbContext>()
        .UseSqlServer(ConnectionString)
        .Options;
    ApplicationDbContext context = new ApplicationDbContext(options);
    var list = context.UserTokens.ToListAsync().Result;
    ApplicationUser user = await context.Users.FirstOrDefaultAsync();
    if (user != null)
    {
        List<IdentityUserToken<string>> tokens = await context.UserTokens.Where(t => t.UserId == user.Id).OrderBy(t => t.LoginProvider).ToListAsync();
        if (tokens.Count > 0)
        {
            string email = tokens.FirstOrDefault(t => t.Name == "Email")?.Value;
            string displayName = tokens.FirstOrDefault(t => t.Name == "DisplayName")?.Value;
            string loginProvider = tokens.FirstOrDefault()?.LoginProvider;
            IdentityUserToken<string> accessToken = tokens.FirstOrDefault(t => t.Name == "access_token");
            IdentityUserToken<string> exiresAt = tokens.FirstOrDefault(t => t.Name == "expires_at");
            if (loginProvider != null && accessToken != null && exiresAt != null)
            {
                DateTime expiresAtUtc = DateTime.Parse(exiresAt.Value).ToUniversalTime();
                DateTime nowUtcAdjusted = DateTime.UtcNow.AddMinutes(1);

                if (nowUtcAdjusted > expiresAtUtc)
                {
                    // Must renew the access token.
                    string refreshToken = tokens.FirstOrDefault(t => t.Name == "refresh_token")?.Value;
                    AspNetUsersAccessToken refreshedToken = null;
                    switch (loginProvider)
                    {
                        case "Google":
                            refreshedToken = await RefreshGoogleTokenAsync(refreshToken);
                            break;
                        case "Microsoft":
                            refreshedToken = await RefreshMicrosoftTokenAsync(refreshToken);
                            break;
                    }
                    if (refreshedToken == null)
                    {
                        return;
                    }
                    accessToken.Value = refreshedToken.AccessToken;
                    exiresAt.Value = refreshedToken.ExpiresAtString;
                    await context.SaveChangesAsync();
                }

                // Create XOAUTH2 key from the user's email and access token.
                string xoauthKey = OAuth2.GetXOAuthKeyStatic(email, accessToken.Value);

                ... now can use XOAUTH2 key for authenticating on the mail server, etc.
            }
        }
    }
}
By default, ReadAspNetUsers sample uses the database of OAuthNetCoreMVC2 sample.
All samples discussed in this article are shipped with MailBee.NET Objects installer and get installed in My Documents\MailBee.NET Objects\Samples as follows:
ReadAspNetUsers sample is also available for .NET Framework 4.5 (in \WinForms\.NET 4.5 OAuth\C#\ReadAspNetUsers folder). It's a different sample intended for use with ASP.NET for classic .NET Framework (and \ASP.NET\cs_2013_oauth_samples\OAuthMVC5 sample).
Copyright © 2006-2024 AfterLogic Corporation. All rights reserved.