Introduction
MailSuite Pro offers integration with various external services: Google, Facebook, Twitter and Dropbox. For each of those services, integration is configured in the similar way - in a special console offered by that service, you create an application and obtain a special set of parameters used for authentication, and specify those parameters in AdminPanel of MailSuite Pro. Once that's done, users will be able to authenticate via those services and use additional features of those services such as file storage.
In addition to supplying API keys etc. in MailSuite Pro AdminPanel, you will need to specify the list of features you'd like to be enabled for your users. The features supported are:
For any of the connectors, at least one feature needs to be selected. For example, it is usually File storage for Dropbox as using Authentication there isn't a typical scenario among users.
Google
This configuration will allow your users to authenticate with their Google accounts or attach files from their Google Drive storage.
Setting up application in Google
1. Navigate to https://console.developers.google.com/project and click Create Project. Supply arbitrary Project Name and click Create. Once the project is created, it will be selected automatically.
2. On the screen currently open, locate Drive API link and click it. Click Enable button. Then in left panel select Overview, locate Google Picker API on that screen and click the link to enable this API.
3. In left pane, select Credentials -> OAuth consent screen. Supply arbitrary Product name shown to users and click Save button.
4. In left pane, select Credentials and click Create credentials button. Choose API key option and then Browser key button. Change Name if needed and click Create button. API key created will be shown. You should save it to use in MailSuite Pro settings.
5. Click Create credentials button and choose Oauth cliend ID option. Application type needs to be set to "Web application".
In Authorized JavaScript Origins, MailSuite Pro URL should be supplied.
In Authorized Redirect URIs list, URLs of the following kind must be added: http://yourdomain.com/webmail/?external-services=google where http://yourdomain.com/webmail/ is product installation URL.
Upon clicking Create button, client ID and client secret will be shown. You should save those to use in MailSuite Pro settings.
Performing configuration in MailSuite Pro
Under Common > External Services screen of AdminPanel, check Google connector and specify the following values for it, using those obtained from Google Developers Console:
- App ID should be set to CLIENT ID value;
- App Secret is set to CLIENT SECRET;
- API Key equals API KEY value. The value is optional, it's needed to let users add shortcuts to Google Drive documents in Files module.
- Features allows for selecting Authentication, File storage or both..
Facebook
Allows for authentication with Facebook account.
Creating Facebook application
1. Navigate to https://developers.facebook.com/apps and click Create a new app.
2. On the left pane, select Settings > Basic tab, and supply product installation URL in App Domains and Site URL fields.
3. From the same page, obtain App ID and App Secret values.
4. Enable Client OAuth Login on Advanced tab.
5. Make sure you have the following option enabled on Status & Review tab:
Do you want to make this app and all its live features available to the general public?
Performing configuration in MailSuite Pro
1. Under Common > External Services screen of AdminPanel, enable Facebook connector by selecting its checkbox.
2. App ID and App Secret values should be set to those obtained from Facebook Developer console.
3. Features should have Authentication selected.
Twitter
Allows for authentication with Twitter account.
Creating Twitter application
1. Navigate to https://dev.twitter.com/apps and click Create a new application.
2. Fill all the mandatory fields, make sure Callback URL is set to } installation URL.
3. From Details tab, obtain Consumer key and Consumer secret values.
Performing configuration in MailSuite Pro
Under Common > External Services screen of AdminPanel, check Twitter connector and specify the following values for it:
- App ID is set to Consumer key value;
- App Secret should be set to Consumer secret;
- Features should have Authentication selected.
Dropbox
Integration with Dropbox allows MailSuite Pro users to authenticate with their Dropbox account and attach files directly from their Dropbox storage.
IMPORTANT: For this to work, MailSuite Pro must be running on SSL-enabled (https) host.
Setting up Dropbox app
1. Open App Console at Dropbox website. You'll be asked to log into your Dropbox account if you're not logged in yet.
2. Click Create App button, then fill the parameters of your application as follows:
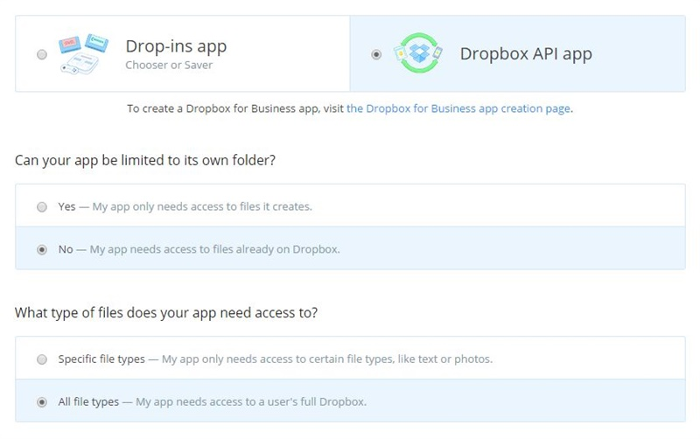
3. Supply arbitrary application name and click Create App.
4. On next screen, the product installation domain(s) must be added under Chooser/Saver domains list. To Redirect URIs list, URLs of the following kind must be added: http://yourdomain.com/webmail/?external-services=dropbox where http://yourdomain.com/webmail/ is product installation URL.
5. Copy App key and App secret values from that screen.
Setting up Dropbox integration in MailSuite Pro
1. Under Common > External Services screen of AdminPanel, enable Dropbox connector by selecting its checkbox;
2. App ID is set to App key value obtained from Dropbox App Console;
3. App Secret should be set to App secret value;
4. Features allows for selecting Authentication, File storage or both.
Removing restrictions of Dropbox integration
By default, a single Dropbox app can only be accessed by up to 100 users. To remove the limit, you'll need to apply for production status as described here.
 MailBee.NET Objects .NET email components: SMTP, POP3, IMAP, EWS, Security, AntiSpam, Outlook, Address Validator, PDF
  MailBee.NET Queue Easy-to-use .NET service to deliver e-mails in the background
  MailBee Objects ActiveX email components: SMTP, POP3, IMAP, S/MIME
  WebMail Pro PHP Webmail front-end for your existing mail server, with personal calendar, contacts, and mobile sync
  ActiveServer Premium addon which brings ActiveSync support to WebMail Pro and Aurora
  Aurora Corporate Groupware system for businesses and providers
  Triton Transactional and newsletter emails sending solution
  MailSuite Pro for Linux Mail server (MTA) bundled with WebMail Pro for a complete solution
  Unified Messaging Solution Technology platform which provides telecom users with a feature-rich messaging portal
