Introduction
WebMail Pro allows for integrating third-party applications, regardless of the programming language they're written in. Those can run on the same server where WebMail Pro runs, or on any different one.
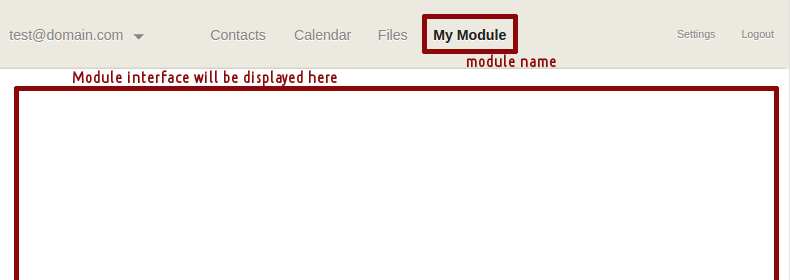
In terms of WebMail Pro, a third-party application integrated into the product is called a module. It is represented by content displayed in main interface screen, and a link in main menu which lets users switch to that module:
Within the module, it's possible to load application pages from any server, make the integrated application aware of the current user context, and of course, utilize Web API to get access to all the features of the product, still doing that all within your own application.
Integration basics
Typically, integrating an application into WebMail Pro starts with embedding the application into WebMail Pro interface visually. That's achieved using API of WebMail Pro.
Adding a module to WebMail Pro requires building a custom template responsible for displaying your application. In the simplest case, it will hold IFrame container, which in turn will contain your application in there.
Also, you will need to make sure the link for invoking the module is added to main menu. Adding new tab to main menu documentation page covers both the tasks of assigning a custom template and adding main menu item.
Getting user context
In a real-world application integrated into WebMail Pro, you will probably need to know current user context, such as email address and display name of the user currently logged in. The example below demonstrates how that is done. Once again, we'd like to underline that it's not required to have the application running on the same server where WebMail Pro runs.
- Download and unpack sample application available here.
- Communication between WebMail Pro and this application is ensured by a plugin available for download here.
- Upon downloading and extracting plugin package content, you'll need to deploy the plugin so that its index file is available at the following location: data/plugins/iframe-app/index.php
- To enable the plugin, add the following to array defined in data/settings/config.php file:
'plugins.iframe-app' => true,
- In case if WebMail Pro and external application run on different domains, add one more entry to data/settings/config.php:
'plugins.iframe-app.allow-origin' => 'http://your.domain.com/',
That would denote domain part of WebMail Pro installation URL. For example, if the installation URL is http://your.domain.com/apps/webmail/ you need to specify http://your.domain.com/ there.
- In default.html file of the application, locate line ~123:
url: 'webmail_root_url?/Ajax/',
In there, you need to specify WebMail Pro installation URL with ?/Ajax/ appended. For the above example of installation URL, that would be:
url: 'http://your.domain.com/apps/webmail/?/Ajax/',
- In templates/iframeAppScreen.html file of the plugin, set app_root_url so that it points to installation URL of the embedded application.
Once both the application and the plugin are installed and configured per the above instructions, an additional item will be displayed in main menu of WebMail Pro interface. You can adjust its name in js/include.js file.
Authenticate as current user
The above sample application provides the following information:
- Account ID
- Account email
- Display name
- AuthToken
So within your own application, you can have information on the user currently logged in. But also, you can authenticate as that user via Web API. That will allow you to get any information about the user, as well as perform various actions as that user: obtain list of email folders and messages, get and send emails, handle files and folders, etc.
Normally, you would need user's password for that - but in this case, you have AuthToken which lets you use API without having access to user passwords.
In our sample application, the following code block sends API request, with AuthToken supplied there, obtains account properties and displays a couple of them:
$.ajax({
	url: 'webmail_root_url?/Ajax/',
	type: 'POST',
	async: true,
	dataType: 'json',
	data: {
		'AccountID': id,
		'Action': 'AccountSettingsGet',
		'Token': token,
		'AuthToken': authToken
	},
	success: function (oData, sType, oXhr) {
		var
			oAccountInfo = oData.Result,
			email = oAccountInfo.Email,
			name = oAccountInfo.FriendlyName
		;

		$('.userEmailViaAPI').text(email);
		$('.userNameViaAPI').text(name);
	},
	timeout: 50000
});
Note that in this particular case, the call is performed from client-side, but it's perfectly possible to do that from server-side code, too.
The application is designed for the most common case when it doesn't matter whether the application and WebMail Pro installation run on the same domain. That's why AuthToken is sent through from the application, as well as into it; see iframe-app/templates/iframeAppScreen.html file.
However, if the application and WebMail Pro installation actually are within the same domain, they will share the authentication cookies automatically, so sending AuthToken is not required, you can omit that one both in the application and in IFrame URL.
Authenticate as any user
Handling current user is one thing, but what if your application needs access to information of some specific user of WebMail Pro, not necessarily the one logged in? If you don't have password for that user, that is.
Starting from version 7.6.3, there is a way to authenticate as any user of the system. It's achieved by enabling master password feature.
If the feature is enabled, system administrator is able to log into any user account with the administrator password - and that works for authentication via Web API, too. So your application will need to use email address / login of the user in question, and administrator password - that would allow to access and manipulate data of any WebMail Pro user account.
 MailBee.NET Objects .NET email components: SMTP, POP3, IMAP, EWS, Security, AntiSpam, Outlook, Address Validator, PDF
  MailBee.NET Queue Easy-to-use .NET service to deliver e-mails in the background
  MailBee Objects ActiveX email components: SMTP, POP3, IMAP, S/MIME
  WebMail Pro PHP Webmail front-end for your existing mail server, with personal calendar, contacts, and mobile sync
  ActiveServer Premium addon which brings ActiveSync support to WebMail Pro and Aurora
  Aurora Corporate Groupware system for businesses and providers
  Triton Transactional and newsletter emails sending solution
  MailSuite Pro for Linux Mail server (MTA) bundled with WebMail Pro for a complete solution
  Unified Messaging Solution Technology platform which provides telecom users with a feature-rich messaging portal
