Introduction
NB: This article explains how to make your application a visual part of WebMail Pro interface. If you're looking for a way to send user credentials to WebMail Pro bypassing its login screen, please check Logging in programmatically page. Additionally, Embedding WebMail into your web application via IFRAME page describes how to place WebMail Pro in IFRAME and, if necessary, send authentication data to WebMail Pro bypassing its own login screen.
You can integrate web application into WebMail Pro by placing that application into IFrame. If needed, application can have access to current user context.
The module we'll use to provide the integration is found at:
https://github.com/afterlogic/aurora-module-webclient-iframe-app
It allows you to place an application into IFrame, provides link for this app in main menu, enables a separate tab for it in admin area and, depending on configuration, may add a tab for it to user account settings.
Installation and configuration
The module is installed according to the standard procedure described at Adding modules documentation page. You'll need to add it to composer.json as follows:
"afterlogic/aurora-module-webclient-iframe-app": "~0.10.0",
At the moment of writing this (January 2023), current version is ~0.10.0. In composer.json file, you can see what version number is supplied for other modules.
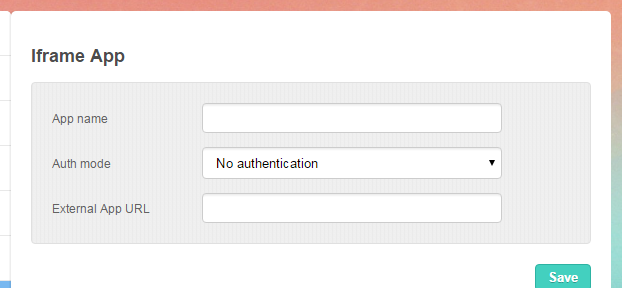
By default, the module operates in "No authentication" mode. In module configuration tab under admin area, you need to provide application name and URL:

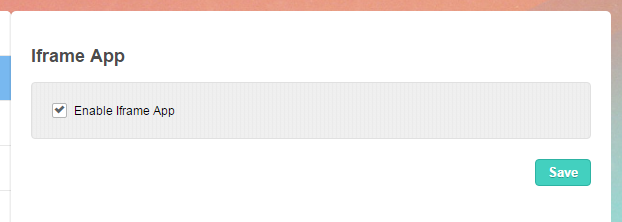
For every user account, it's possible to disable or enable the use of the application:

Authentication
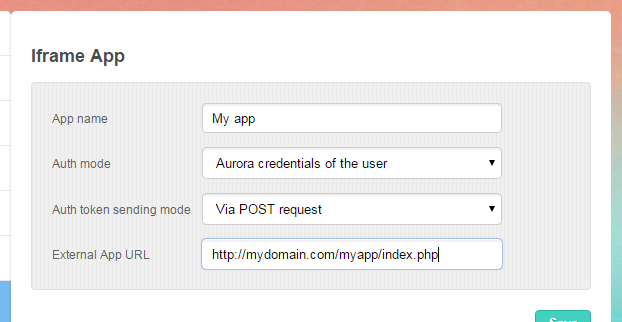
Additionally, the application can have current user context passed into it by providing auth token, so the application can get access to user account credentials, be it WebMail Pro ones or some custom credentials specified for particular user account:

Let's suppose the application requires credentials of the current user. Those aren't passed into application directly, though; only authentication token is sent through. However, with the use of Aurora Web API, it's possible to retrieve user account credentials.
Assuming that External App URL was set to http://mydomain.com/myapp/index.php, the application can obtain account details with the following code in that index.php file:
$sAuthToken = ( isset($_REQUEST["aurora_auth_token"]) ? $_REQUEST["aurora_auth_token"] : "" );
$aPostData = array(
    "Module" => "IframeAppWebclient",
    "Method" => "GetCredentials"
);
$rCurl = curl_init();
curl_setopt_array($rCurl, array(
    CURLOPT_URL => "http://mydomain.com/webmail/index.php?/Api/",
    CURLOPT_CUSTOMREQUEST => "POST",
    CURLOPT_POST => true,
    CURLOPT_POSTFIELDS => $aPostData,
    CURLOPT_SSL_VERIFYPEER => false,
    CURLOPT_RETURNTRANSFER => true,
    CURLOPT_HTTPHEADER => array("Authorization: Bearer " . $sAuthToken)
));
$mResult = curl_exec($rCurl);
$oResult = ($mResult !== false) ? json_decode($mResult) : null;
if ($oResult !== null && isset($oResult->Result) && isset($oResult->Result->Password))
{
    echo "Password is available";
/*
    Credentials are available as:
    $oResult->Result->Login
    $oResult->Result->Password
*/
}
else
{
    echo "Password is NOT available";
}
NB: If "Aurora credentials of the user" auth mode is selected, it is not possible to obtain account password. You will only get Login, and you can be certain that's the user who is currently logged into WebMail Pro installation. You can only get both Login and Password if one of "Custom Credentials" auth modes is used.
Note that in the above code, it doesn't matter whether auth token is passed via GET or POST, it would work either way.
Cross-domain cookies in IFrame
It appears that Google Chrome and other Chromium-based web browsers blocks cookies within cross-domain IFrame unless they have SameSite attribute explicitly disabled. We plan to add a configuration option for that, meantime you can correct the behavior by modifying statis/js/app.js file. Locate the following code in it:
return (document.cookie = [
    encode(key), '=', stringifyCookieValue(value),
    options.expires ? '; expires=' + options.expires.toUTCString() : '', // use expires attribute, max-age is not supported by IE
    options.path    ? '; path=' + options.path : '',
    options.domain  ? '; domain=' + options.domain : '',
    options.secure  ? '; secure' : ''
].join(''));
and adjust it as follows:
return (document.cookie = [
    encode(key), '=', stringifyCookieValue(value),
    options.expires ? '; expires=' + options.expires.toUTCString() : '', // use expires attribute, max-age is not supported by IE
    options.path    ? '; path=' + options.path : '',
    options.domain  ? '; domain=' + options.domain : '',
    options.secure  ? '; secure' : '',
    '; SameSite=None'
].join(''));
You'll need to set "UseAppMinJs" to false in data/settings/config.json file for this to work (so that non-minified JavaScript is loaded instead of minified one), and clear browser cache to apply changes.
NB: Currently, it seems setting SameSite=None will only work if Secure attribute is set - which in turn only happens if the installation is accessed over https. To make this work, you need to have both the external website and the WebMail Pro installation accessed over https rather than http.
Forking
The above assumes that you're simply installing the module the way it is, performing its configuration and using it on your installation. There might be cases, however, when you need to create a modification (fork) of the module. For example, if you need to integrate two different web applications into the same WebMail Pro installation, you cannot reuse the same module twice. Instead, you would need to create a copy of the module, set it up in a separate repository, and rename a few entries throughout the module files, the changes are listed below.
During the development (especially on its initial stage) you would probably wish to, rather then dealing with creating a fork repository, have a separate copy of the module residing under modules directory next to the original module. Upon creating such a clone, you would need to rebuild static files as explained here.
- Module directory
The module itself needs to be renamed from IframeAppWebclient into the custom name.
- composer.json
In this file, you'll need to alter the lines:
{
    "name": "afterlogic/aurora-module-webclient-iframe-app",
...
        "dist":{
               "url":"https://github.com/afterlogic/aurora-module-webclient-iframe-app/archive/master.zip",
...
    "extra": {
        "installer-name": "IframeAppWebclient"
so that they reflect new module name and its download location.
- Module.php
To avoid conflict with other instances of this module or its forks, you need to rename namespace found here:
namespace Aurora\Modules\IframeAppWebclient;
- templates/MainView.html
<div class="screen IframeApp" style="display: none;">
While technically CSS class name affects nothing, it's a good practice to have HTML container renamed according to your module name.
- Overall source code adjustments
In addition to the above changes, you'll also need to go through all the files of the module - PHP, Javascript, .ini files etc., search and replace IframeApp with the core name of your module.
For example, if your module is called InfoAppWebclient you'll need to search and replace throughout the files as follows, in case-sensitive fashion:
• IframeApp -> InfoApp
• iframeApp -> infoApp
• IFRAMEAPP -> INFOAPP
• Iframe App -> Info App
• iframe-app -> info-app
You'll also need to rename the following files:
• js/views/IframeAppSettingsFormView.js -> InfoAppSettingsFormView.js
• vue/components/IframeAppAdminSettings.vue -> InfoAppAdminSettings.vue
• vue/components/IframeAppAdminSettingsPerUser.vue -> InfoAppAdminSettingsPerUser.vue
- Language files
While it's not required, you may wish to adjust text constants found in language files under i18n directory.
 MailBee.NET Objects .NET email components: SMTP, POP3, IMAP, EWS, Security, AntiSpam, Outlook, Address Validator, PDF
  MailBee.NET Queue Easy-to-use .NET service to deliver e-mails in the background
  MailBee Objects ActiveX email components: SMTP, POP3, IMAP, S/MIME
  MailBee Message Queue Queue-based background sending of emails
  WebMail Pro PHP Webmail front-end for your existing mail server, with personal calendar, contacts, and mobile sync
  WebMail Pro ASP.NET Webmail front-end for your existing mail server, with calendar sharing and global contacts
  ActiveServer Premium addon which brings ActiveSync support to WebMail Pro and Aurora
  Aurora Corporate Groupware system for businesses and providers
  Aurora Files Your personal cloud storage
  Triton Transactional and newsletter emails sending solution
  MailSuite Pro for Linux Mail server (MTA) bundled with WebMail Pro for a complete solution
  Unified Messaging Solution Technology platform which provides telecom users with a feature-rich messaging portal


